 User Configuration: Processing Tab
Auto Ranging Configuration
Often files are stored in numerical sequences. This happens when images are stored directly from a camera or other imaging device. It is also common on sites where images are presented as a set of related images. Auto ranging is designed to work specifically with these types of file sequences.
|
Auto ranging configuration is used when you
|
Auto ranging may be turned off for options 1, 3, and 4 by deselecting {Auto range when adding to the Collection} in the user configuration or by use of the Auto Range Override toolbar extension.
The Auto Ranging Process
In the following discussion remember the values of {Auto range when adding to the Collection} and {Size of Range} can be overridden by the use of the Auto Range Override toolbar extension.
When chosen in the Fusker Tree Menu, auto ranging is always applied to the current segment selection in the fusker collection. If the selected segment is already fusked or is not a directory or file segment the Auto Range option will not be enabled.
Auto ranging is also applied when individual file references are added with either the
![]() button or the URL Capture Bar. In these cases it is applied
to the last segment of the URL being added on if {Auto range when adding to the Collection} is enabled.
button or the URL Capture Bar. In these cases it is applied
to the last segment of the URL being added on if {Auto range when adding to the Collection} is enabled.
Files added through
![]() processing of a hosted gallery page, Image Surfer Pro Form, or during a
Directed Search are not Auto Ranged.
processing of a hosted gallery page, Image Surfer Pro Form, or during a
Directed Search are not Auto Ranged.
Auto ranging consists of applying the following steps to the selected segment:
- Determine segment's numeric value and size information
- Determine the start of the numeric range
- Determine the end of the numeric range
- Create the segment fusk
Determining a segment's numeric value:
Image Surfer Pro reverse searches the entire text of the selected segment looking for a numeric digit (i.e. 0 through 9). For file segments any file extenion is ignored (such as .mp4). If it does not find any numeric digits in the string then auto ranging can not be applied and the segment is unchanged.
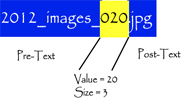
When a digit is found, adjacent characters in the string which are also numeric digits are grouped into a substring. The text after the substring is placed in the segment's Post Text field while the text before the substring is placed in the segment's Pre Text field. The number of digits in the substring will be used as # of Digits in the numeric fusk. The numeric value of the segment is defined as the numeric value of the string of digits found.
If there are multiple strings of digits in the segment text, only the last string of digits is used. In order to fusk over both strings you must manually split the segment such that each split segment has one of the numeric strings.
For example
Determining the start of the numeric range:
The start value of the numeric fusk is chosen in one of three ways based on what is activated in the user configuration.
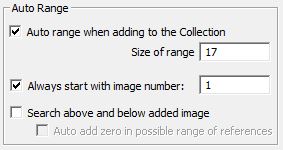
If {Always start with image number} is enabled the start value will be set to the value from the user configuration. This is useful if you know many of the image sequences you are collecting have the same starting number but you don't always have access directly to the first image in the sequence.
If neither {Always start with image number} nor {Search above and below added image} are selected then the numeric value of the segment will be used as the start value.
if {Search above and below added image} is enabled the value of {Size of Range} and {Auto add zero in possible range of references} are used to determine the start value. The start value will be the segment value minus one half of {Size of Range} unless the value would be less than 1. If the start value would be 0 or less and {Auto add zero in possible range of references} is enabled then start value will be set to 0, otherwise it will be set to 1.
Determining the end of the numeric range:
The end of the numeric range is always the start value plus {Size of Range} minus 1. This assures the numeric range contains exactly {Size of Range} values.
Example:
For example using the sample image file name above and the following configurations will result in the different numerical fusks.
| 2012_images_020.jpg | |||
|---|---|---|---|
| Configuration | # of Digits | Start Value | End Value |
|
Size of Range = 17 Always start with image number {Disabled} Search Above and below added image {Disabled} |
3 | 20 | 36 |
|
Size of Range = 17 Always start with image number {Enabled} = 1 Search Above and below added image {Disabled} |
3 | 1 | 17 |
|
Size of Range = 17 Always start with image number {Disabled} Search above and below added image {Enabled} Auto add zero in possible range of references {Enabled} |
3 | 12 | 28 |
|
Size of Range = 25 Always start with image number {Disabled} Search above and below added image {Disabled} |
3 | 20 | 44 |
|
Size of Range = 25 Always start with image number {Enabled} = 10 Search above and below added image {Disabled} |
3 | 10 | 34 |
|
Size of Range = 25 Always start with image number {Disabled} Search above and below added image {Enabled} Auto add zero in possible range of references {Enabled} |
3 | 0 | 24 |
{Search above and below added image} and {Always start with image number} can not both be enabled at the same time (selecting one will unselect the other).
Creating the segment fusk:
The original text which contained the digits is removed and a Numeric Fusk is placed in the segment. The fusk will have {# of Digits} set to the segment's numeric size from step 1, {Start Value} set to the start value computed in step 2, and {End Value} set to the end value computed in step 3.
Auto Ranging is applied to the new file segment before it is merged into the existing fusker tree. The Optimization Process may be applied to the new file segment as it is merged into the existing fusker tree.